Export Data to QuickBooks®
1. Introduction
Note: Export of commission data into QuickBooks® is complex. It would be better to run this process with the help of Consultants. Please Contact us for further assistance.
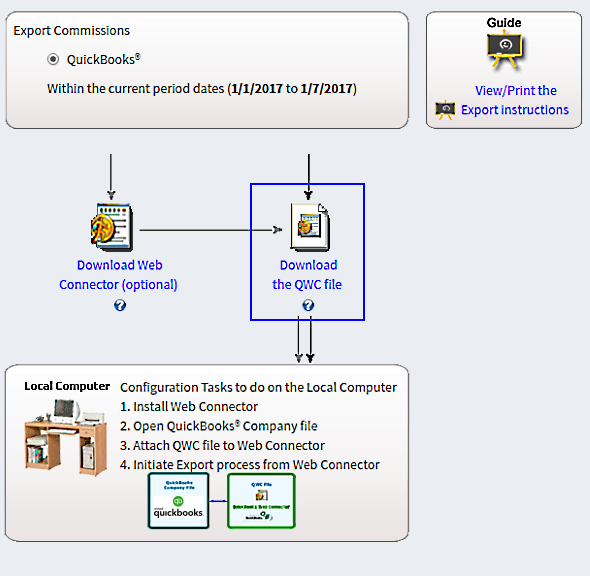
2. Export Diagram
3. Prerequisites
To export from Easy-Commission, the computer should have the following things;
- QuickBooks® Application
- QuickBooks® application needs to be available to export data from Easy-Commission. - QuickBooks® Web Connector
- Web Connector needs to be installed if not exists in the computer. - QWC file (Web Connector configuration file)
- The configuration file will be downloaded from Easy-Commission Export page and used to initiate the Export process from computer.
4. Steps involved in Export Process
a) One time setup
- Export Settings
Before proceeding with Export process, Export settings needs to be saved in Easy-Commission.
>> Go to Payout Process>>Export>> Click "Save" to store the Export settings.
ii. Download and Install QuickBooks® Web Connector (optional)
Web Connector is an application which enables data exchange between Web applications and QuickBooks®. This is an optional step. To identify QuickBooks® Web Connector is already installed in the system,
- Click Start - Programs - QuickBooks® - Web Connector
- Open Web Connector. Verify the version that shows in the top of the application. If it shows version 2.3.0.36 or above, then no need to download and install the Web connector in the computer.
-
- Please note that, this is one time activity.
- iii. Download Web Connector Configuration (QWC) file
Web Connector configuration file (QWC) file is the key file which is used to communicate the data exchange between Easy-Commission and QuickBooks® via Web Connector.
To download QWC file,
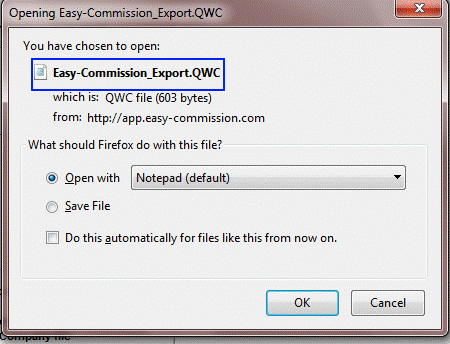
Open the Payout Process>>Export page, click the "Download the QWC file" link and save it in the computer.
-
-
Please note that, this is one time activity. For next execution onwards, you can directly double click/open the downloaded QWC file which is saved locally in the computer and initiate the export process.
-
iv. Attaching QWC file to Web Connector
- Open QuickBooks® application and open the Company file to which Easy-Commission data is exported.
- QuickBooks® company file is setup with allowing other applications to access with company file.
- To verify this, open QuickBooks®, go to Edit menu - Preferences - Company Preferences - Integrated Applications.
- Please make sure, "Don't allow any applications to access this company file" option is unchecked.
- Double-Click to open the QWC file (that was locally saved in the above step).
- The QWC file will be opened with QuickBooks® Web Connector. After few seconds, a screen will be open up for authorizing web service. Click "Ok" to continue the process.
After authorizing web service, QuickBooks® will open up a dialog (this will be opened inside QuickBooks® application) for granting permissions for the Integrating applications. Choose "Yes, whenever this QuickBooks® company file is open" option and click "Continue" to proceed the process.
Choose the options as highlighted in below screen shot to allow Easy-Commission the access to your QuickBooks® company file.Now Easy-Commission is attached with QuickBooks® for reading data from the company file. The attached application will be shown in QuickBooks® under Edit menu - Preferences - Company Preferences - Integrated Applications.
b) Starting export process
- Initiate Export process from QuickBooks® Web Connector
After adding QWC file to QuickBooks® Web Connector, the Easy-Commission data export to QuickBooks® needs to be initiated from Web Connector.
To initiate export process, Open QuickBooks® Web Connector
- Choose "Easy-Commission" application (point 1 in the below screenshot)
- Enter the Easy-Commission login password in the password box. (point 2 in the below screenshot)
- After entering the password, Web Connector will show a message box for saving password. Choose "Yes" or "No" based on your desire.
- Click "Update Selected" button to initiate the process.
The progress of exporting data from QuickBooks® will be shown in the Web Connector GUI.
ii. Export of Vendor Commission:
-
Before exporting commission to vendor as bills, make sure that Sales Rep (who is actually the Vendor in QuickBooks®) in Easy-Commission has “Employee” field unchecked and “Accounts Payable” field filled with Vendor’s QuickBooks® Account name (example, “Automobile Expense”) as shown below
The progress of exporting data from QuickBooks® will be shown in the Web Connector GUI.
Every export of AP commission data to QuickBooks® creates new bills.
iii. Export of Employee Commission:
-
Before exporting the commission of sales rep, who is actually an employee in QuickBooks®, please make sure, the employee flag in sales rep page of Easy-Commission is selected, as shown in below screen shot,
5. FAQ
- What are all the Easy-Commission data that can be exported to QuickBooks®?
Commission statement of Rep can be exported to QuickBooks®.
When Rep is an Employee (Employee check box is checked in Sales Rep page), commission statement is exported to QuickBooks® as ‘Payroll’.
When Rep is a Vendor (Employee check box is unchecked), commission statement is exported to QuickBooks® as ‘Bills’ - I could not find the related Payroll or Bill after exporting Employee and Vendor commissions to QuickBooks®?
For Employee commission export, ensure that ‘Employee’ check box in ‘Rep’ page of Easy-Commission is checked and corresponding QuickBooks® account name is given in ‘Accounts Payable’.
Similarly for Vendor Commission Export, ensure that ‘Employee’ check box in ‘Rep’ page is unchecked. - I have made necessary changes for both Employee and Vendor in Rep page and exported commissions to QuickBooks®, but still I am unable to find related Payrolls and Bills?
This problem may occur due to incorrect configuration settings done while connecting Easy-Commission to QuickBooks®
‘Allow this application to access personal data such as Social Security Numbers and customer credit card information’ check box in QB application certificate should be checked. If this is not checked export process will not work.
To ensure whether this is checked, do the following steps in QuickBooks®.
Step 1: Go to Edit->Preferences->Integrated Applications
Step 2: Select Company Preferences tab
Step 3: Select Easy-Commission application and click ‘Properties’
No. It is not possible to export data to QuickBooks® Online.
5. How can you identify the Bills exported from Easy-Commission?
You can identify the exported bills through Reference Number. Reference number for the exported bills will be in the format “EmployeeName:PeriodNumber:CommissionYear”.
6. After starting export process in Web Connector will I able to work in Easy-Commission?
Yes. Since export process will run as a background process, you are able to work on Easy-Commission pages.
7. What are the supported QuickBooks® versions in Easy-Commission?
For supported editions, please refer FAQ
8. I already have QuickBooks® Web Connector. Do I need to download and install again?
Easy-Commission supports Web Connector version 2.3.0.36 and above. To verify the version
- Open Web Connector. Verify the version that shows in the top of the application. If it shows version 2.3.0.36 or above, then no need to download and install the Web connector in the computer.
In case of your Web Connector version is less than this, please uninstall the existing version. Download and install the Web Connector from Easy-Commission.
6. Troubleshooting
| Error Code | Issue/Question | Cause | Solution |
| Update aborted. Problem locking company file | Web Connector locks the company file when it is attached. Without removing the QWC file, trying to add another company file error occurred. | Open company file. Remove the QWC file from Web Connector. Open another company file, add the QWC file and continue the export process. | |
| QBWC 1053 | QuickBooks® Web Connector failed to connect. QuickBooks® returned the following error: <QBWC 1053: A modal dialog box is showing in the QuickBooks® user interface>. Fix the problem and click OK to try again. | A modal dialog is opened in the QuickBooks® company file. | Close the modal dialog in QuickBooks® company file and restart the QWC attaching process. |
| QBWC 1039 | There was a problem adding the application. Check QWCLog.txt for details. Error connecting to QuickBooks®. Error message received from QuickBooks® was <if the QuickBooks® company data file is not open, a call to the “Begin Session” must include name of the data file>. If you do not have QuickBooks® installed on this system , you would need to install it before running web connector |
QuickBooks® company file is not opened before attaching QWC file to Web Connector. | Open QuickBooks® company file to which Easy-Commission data is exported. Attach the QWC file to Web Connector. Still the problem exists please contact Easy-Commission support. |
| QBWC 1039 | There was a problem adding the application. Check QWCLog.txt for details. Error connecting to QuickBooks®. Error message received from QuickBooks® was <This application does not have permission to access this QuickBooks® company data file. The QuickBooks® administrator can grant access permission through the integrated Application preferences>. If you do not have QuickBooks® installed on this system , you would need to install it before running web connector |
QuickBooks® Company file doesn’t setup with allowing other applications to interact with data. | Open QuickBooks®; go to Edit menu -Preferences- Company Preferences- Integrated Applications. Please make sure, “Don’t allow any applications to access this company file” option is Unchecked. Still the problem exists please contact Easy-Commission support . |
| QBWC 1039 | There was a problem adding the application. Check QWCLog.txt for details. Error connecting to QuickBooks®. Error message received from QuickBooks® was <The QuickBooks® user has denied the access >. If you do not have QuickBooks® installed on this system , you would need to install it before running web connector |
This is due to not granting permission to Easy-Commission, while attaching the QWC file with Web Connector | QuickBooks® will open up a dialog (this will be opened inside QuickBooks® application) for granting permissions for the Integrating applications. Choose "Yes, whenever this QuickBooks® company file is open" option and click "Continue" to proceed the process. Still the problem exists please contact Easy-Commission support. |
| QBWC 1039 | There was a problem adding the application. Check QWCLog.txt for details. Error connecting to QuickBooks®. Error message received from QuickBooks® was <This application has not accessed this QuickBooks® company data file before. The QuickBooks® administrator must grant an application permission to access a QuickBooks® company data file for the first time >. If you do not have QuickBooks® installed on this system , you would need to install it before running web connector |
This is due to having administrator rights to grant permission for Easy-Commission | Open QuickBooks® company file in single user mode with QuickBooks® Administrator login. Attach the QWC file to QuickBooks® and grant the permission for Easy-Commission. Still the problem exists please contact Easy-Commission support. |
| QBWC 1026 | There was some problem adding fileID. | Please contact Easy-Commission support. | |
| QBWC 1040 | Invalid password for username. Web connector did not provide a valid username and/or password. |
Invalid password is given | Provide Easy-Commission login password correctly |
| QBWC 1041 | SendRequestXML failed due to error message <error message> | Please contact Easy-Commission support. | |
| QBWC 1042 | ReceiveResponseXML failed due to error message <error message> | Please contact Easy-Commission support. | |
| QBWC 1043 | getLastError failed due to error message <error message> | Please contact Easy-Commission support. | |
| QBWC 1044 | CloseConnection failed due to error message <error message> | Please contact Easy-Commission support. | |
| QB web connector throws "Error!" | Please contact Easy-Commission support. | ||
| QBWC 1048 | QuickBooks® Web Connector could not verify the web application server certificate | Please contact Easy-Commission support. |


